|
Using the HL7 Simulator |
Previous Top Next |
Typically you will use the HL7 simulator to verify that your listening service application is configured properly and can receive HL7 messages. To use it you will need a sample file that contains one or more valid HL7 message(s). If you are connecting to a HermeTech HL7 Message Listener, you will probably want to have a monitor application running while the simulation is running.
Step 1: Start the simulator program.
Step 2: Select the appropriate connection information.
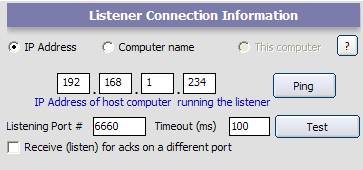
| • | IP Address - Use this if you are connecting to a remote computer. Enter the TCP/IP address of the computer to connect to. Use the 'Ping' button to test the connection. NOTE: The 'Ping' button is a quick lightweight way to verify that a network address supplied is in fact valid and visible on your network. It is functionally similar (although not equivalent) to running PING from a command line prompt. If the IP address you are connecting to is actually part of a VPN or remote network, PING may actually fail. If this happens, it's a good idea to complete entering your data and try to actually run a simulation to determine if you can actually connect and send to a particular IP address. |
Example IP Address Settings
Example IP Address Settings with alternat ACK Port
Some listener services may wish to send HL7 Acknowledgements back to the simulator on a different TCP/IP port. If so, then the simulator actually has to set up it's OWN HL7 listener to receive those acknowledgements. If you need this functionality, check the box shown above and enter the port number
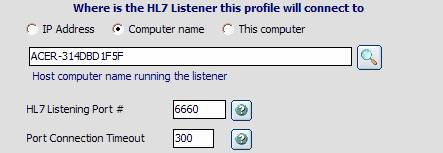
| • | Computer Name - Use this setting if you are connecting to another computer on your LAN which has only ONE TCP/IP address. Click the browse button to select the computer name. If you select or enter a computer name with multiple TCP/IP addresses (even if it's the same computer you're working on), you will be warned that you must choose the 'IP Address' option and enter which specific TCP/IP address you wish to send to on the target computer. |

| • | This Computer - You can use this setting if you are connecting to a listener service running on the same computer as the simulator. *NOTE: as shown in the example above, this option will be disabled if your computer has more than one TCP/IP address. |

Step 3: Enter the Transmission Profile information. The default information in this section is valid unless you are using non-hl7 standard communication packets.
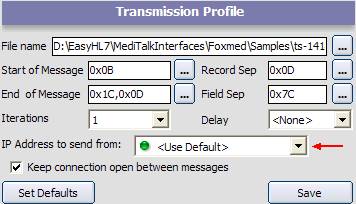
| • | File Name - The full path and file name of a file containing at least one valid HL7 message. *NOTE* the messages in the test file do not need to contain the 'start of message', 'end of message' characters, these will be handled by the simulator automatically during the simulation. Click the browse button next to the file name field to select a file. |
| • | Start of Message - The Ascii character(s) that mark the beginning of an HL7 message. |
| • | End of Message - The Ascii characters(s) that mark the end of an HL7 message. |
| • | Record Sep - The Ascii character(s) that is used as the record (hl7 segment) separator. |
| • | Field Sep - The Ascii character (one character only) that is used as the field separator in the HL7 messages. |
| • | Iterations - The number of times to run the simulation (between 1 and 10,000). |
| • | Delay - The amount of time (if any) to pause between each message. |
| • | IP Address to send from - <NEW in V4.0>To function the simulator must establish a TCP/IP connection between your computer and a TCP/IP address on the computer running the listener service. If the computer you are running the simulator on has multiple TCP/IP addresses you can select a specific TCP/IP address to use when making this connection (necessary with some VPN connections) or you can select <Use Default> in which case the simulator will iterate through all of the TCP/IP addresses on your computer and attempt to establish the connection on each one. |
| • | Keep connection open between messages - <NEW in V4.0>If checked the TCP/IP connection will be kept open during your entire simulation, if unchecked, the connection will be closed and reopened between each message sent. |
If necessary, save these settings for future use by clicking the 'Save' button. If you are unsure or feel you have made an error use the 'Set Defaults' button to restore everything to the system default values.
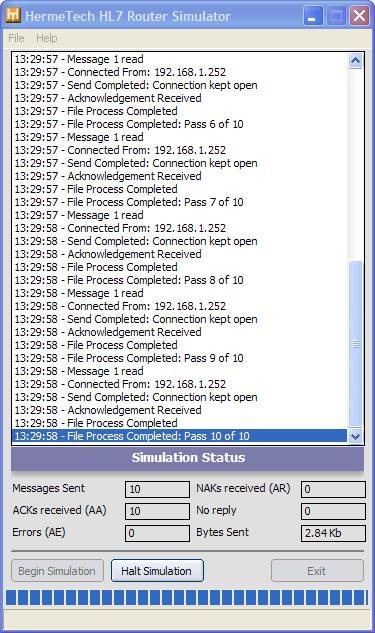
Step 4: Click 'Begin Simulation' to start running the simulation.
![]()
While a simulation is running the 'Halt Simulation' button will become enabled and statistics are accumulated in the Simulation status section, and a process trace list will appear detailing the progress of the simulation. To stop the simulation before completion click the 'Halt Simulation' button.