Using the Schema Engine to create new HL7 messages

Contents

To export HL7 messages from your database schemas you must create an "Outbound" processor.

Outbound Processor Properties
Next to each field is an immediate help button( ) click it to receive an immediate summary of what each field is and its requirements.
Create outbound processor profiles to export HL7 message data which you have placed into the EasyHL7 database schema tables. If properly done, the outbound processor will:
1.(New in V3.2) If configured it will execute a stored procedure created by you before a processing cycle begins. This means that if you are (or care to) use a MS SQL stored procedure which will insert the HL7 data elements into your schema data tables (see below) you can now have the UltraPort Schema Engine execute this procedure for you. See Outbound Stored Procedures.
2.Identify OUTBOUND HL7 messages which need to be exported.
3.Assemble the OUTBOUND HL7 message from the underlying schema data tables.
4.Store the entire message in the HL7Message field in the <PREFIX>_HL7Data table.
5.Write the HL7 message into the Outbound Folder defined in the outbound processor profile. **New In Version 3: You can now choose the 'No Export' option and the Outbound Processor will NOT write the HL7 message into a folder. See Creating Your Own Export Process.
How to Create HL7 Messages Using the Schema Tables
It's very difficult to document how to insert the HL7 data into the SQL Schema properly since so much of this process relies on you and HOW you actually get the data from your own system and what process/language you are developing this process in.
To understand HOW to create the data for an outbound message, it's important that you know how the Schema Engine IMPORTS messages. This is very important because when creating OUTBOUND messages your job is to basically do the same thing as an Inbound Processor does, only you have to do it backwards. Before reading further, we highly recommend that you read the section on Inbound Processors AND the section on Navigating the Schema. We also recommend that you practice importing some HL7 messages into your schema tables first and really examine all of the tables/fields which it populates.
When IMPORTING a new HL7 message into your schema the inbound processor performs the following steps:
1. It Generates a Unique MessageID (GUID)
2. It inserts a row into the <PREFIX>_HL7Data table. When it's inserted the row will have the Inbound field set to 1 (this is an INBOUND message), the Loaded field set to 0 (the processor has NOT finished loading the underlying data tables), the Processed field set to 0 (YOU have not 'processed' the message yet), the LastLoaded Field is set to the system date/time, the HL7Message field will contain the ENTIRE HL7 Message and the PartnerApp field will contain a compound key (see the section on uniqueness in Inbound Processors).
3. It then populates the <PREFIX>_MessageManifest table. This table basically contains a sequential listing of every segment which occurs in the message (MSH segment is always #1).
4. It then populates all of the appropriate underlying segment database tables with the parsed HL7 data fields/component data.
5. After all of this has been done, the processor will return to the <PREFIX>_HL7Data and update the Loaded field setting it to 1. Indicating that the processor has completed loading the message into the schema tables and it is now safe for you to process at your leisure.
When EXPORTING HL7 messages you have to do this exact process only (almost) in reverse.
1. You must generate a UNIQUE MessageID. We use a GUID (Select NewID() in MS SQL Works just fine), but any guaranteed unique key value which will fit into the MessageID columns is fine.
2. (NOTE that steps 2 and 3 are interchangeable). You should then insert the appropriate rows into the <PREFIX>_MessageManifest table. Again this table contains only 3 pertinent columns the MessageID (generated in step 1), the SegmentName (MSH, PID, EVN etc, etc) and the SegmentIDX which is the physical sequence in which each segment should appear in the message. MSH = 1, and so on and so on. There should be 1 row in this table for every HL7 segment which your message contains. This SegmentIDX column is used to link/list the IDX column in the underlying segment data tables.
3. (NOTE that steps 2 and 3 are interchangeable). You then populate the underlying data tables by inserting rows with MessageID (generated in step 1) and IDX (equal to the SegmentIDX from step 2) and then complete the data fields. IMPORTANT NOTE: If you are creating HL7 segment data for a segment which has 2 tables associated with it (Like the IN1 segment or GT1 segment etc) then you must insert a row into BOTH the _A table and the _B table even if you aren't populating any data fields other than the MessageID and the IDX.
4. After you have done all of this then you will insert a row into the <PREFIX>_HL7Data table using the MessageID (generated in step 1). ANOTHER IMPORTANT NOTE: If you are creating messages that use HL7 Repeating fields or SubComponent values then make sure that you review the section on HL7 Repeating Fields thoroughly.
5. See below for more detail.
INSERTING YOUR ROW INTO THE <PREFIX>_HL7Data Table
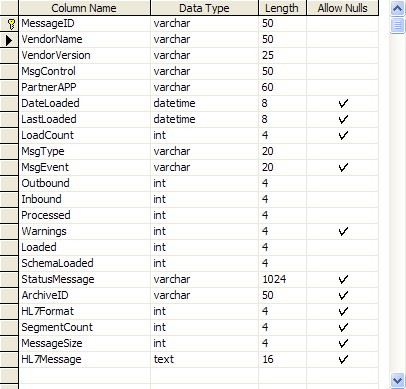
• MessageID - Your unique MessageID (See step 1 above)
• Vendor Name - The EasyHL7 Vendor Name defined in the Schema Profile (Example: Default).
• Vendor Version - The EasyHL7 Vendor Version defined in the Schema Profile (Example: 2.3).
• MsgControl - The HL7 Message Control Number (MSH Field 10)
• PartnerAPP - This field is used by Inbound Processors to determine uniqueness. However it is indexed so we recommend that you also set this field to your MessageID.
• DateLoaded - Defaults to GetDate()
• LastLoaded - Defaults to GetDate()
• LoadCount - Set to 1
• MsgType - The HL7 Message Type (MSH Field 9, Component 1)
• MsgEvent - The HL7 Message Event (MSH Field 9, Component 2)
• Outbound - Set to 1 (this is an outbound message)
• Inbound - Set to 0 (this is NOT an inbound message)
• Processed - IMPORTANT. Set to 0 (ZERO). This is the field which tells the Outbound Processor this message is ready to be exported.
• Warnings - Ignore (Default 0).
• Loaded - IMPORTANT. Set to 0. This field tells the Outbound Processor that the HL7 Message needs to be assembled from the underlying data tables. Once the processor has exported the message it will update this field to 1.
• SchemaLoaded - Ignore this field
• StatusMessage - Ignore
• ArchiveID - Ignore
• HL7Format - Ignore
• SegmentCount - How many segments does the message contain (optional)
• MessageSize - Ignore (completed by the outbound processor).
• HL7Message - IMPORTANT. IGNORE. The HL7Message field is populated by the Outbound Processor. Before it exports the message to an HL7 file the processor will insert the entire HL7 message into this column.
Playing with Data: Converting an INBOUND message into an OUTBOUND message.
Scenario 1. Ok, you've imported 1 or more HL7 messages into your database schema and want to see an outbound processor really work. Doing this is simple, simply select any row in your <PREFIX>_HL7Data table which contains an inbound message (INBOUND = 1). Update that row and set the Inbound field to 0, the Outbound Field to 1 and the Processed field to 0. Then start (or create and start) the outbound processor profile. You should see it pick up the the row, process it and export the HL7 message to the outbound folder. If you then look at that row in the <PREFIX>_HL7Data table you will note that the outbound processor changed the Processed field to 1.
Scenario 2. (ONLY FOR PATIENT CENTRIC MESSAGES) Using the EXACT SAME ROW you used in Scenario 1, find the patient information in the <PREFIX>_Segment_PID_A table. (Select * From <PREFIX>_Segment_PID_A Where MessageID = '<MessageID>' will work just fine. Update the field PID_F5_C1 (Patient Surname) and change the current value to something else. THEN repeat the steps in Scenario 1 EXACTLY. After the outbound processor exports the HL7 message file open that file using a good HL7 Editor (Like the UltraPort HL7 Notepad) or a text editor. Find the Patient Name field in the PID segment and look at the value. IT DID NOT CHANGE. It still contains the old value. What Happened? Why didn't your updated value get exported?.
Scenario 2 - Explained. Here is what happened. You changed the Patient Surname in the <PREFIX>_Segment_PID_A table to a new value but that value did not get exported by the outbound processor. This happened because of the way that the outbound processor works. When you set the Processed field in the <PREFIX>_HL7Data table to 0, that caused the outbound processor to detect that the message needed to be exported BUT because the LOADED field in the <PREFIX>_HL7Data table was set to a 1 (which it was because this message started as an INBOUND message) AND the HL7Message field was NOT NULL, all that the processor did was to take the HL7Message field and dump it to the file. To get your updated data field to be exported you MUST set the Loaded field back to 0. This tells the processor that it must ASSEMBLE the HL7 message by extracting the data from the underlying data tables.