|
Configuring the HL7 Router |
Previous Top Next |
The Router Configuration application (listenerconfig.exe) was installed when you ran setup.exe (see Installation Instructions). To open the program, from the windows 'Start' menu select 'Programs' then under the 'Hermetech HL7' group click 'HL7 Listener Configuration', this program contains the configuration utility for both the HL7 Listener and the HL7 Router.
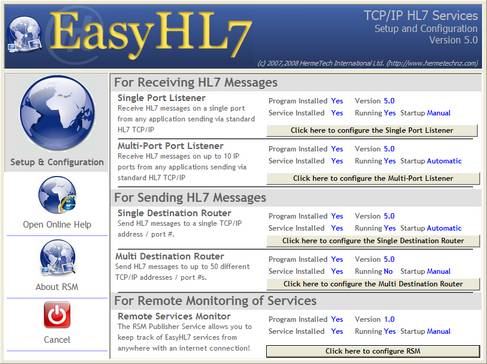
The welcome screen will open. Click the button that says 'Click here to configure the Single Destination Router' in the section labeled 'For Sending HL7 Messages'.
configuration menu
![]() *IMPORTANT* For first time Router installation. After you have completely filled out this window and saved your configuration (see below) you MUST click 'File' then 'Install Router Service' to register the application in your systems services.
*IMPORTANT* For first time Router installation. After you have completely filled out this window and saved your configuration (see below) you MUST click 'File' then 'Install Router Service' to register the application in your systems services.
TCP/IP Settings
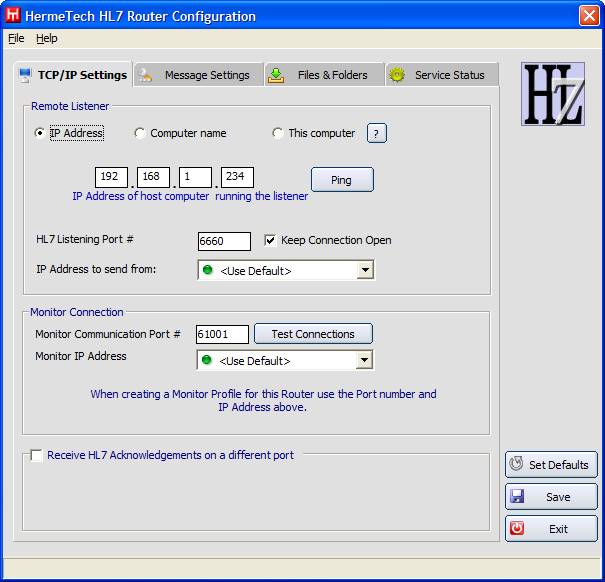
Use the 'Set Defaults' button to restore or set the system back the recommended default values. Use the 'Save' button to save your router configuration settings. If the router service is running you can use the 'Test Connection' button to verify the connection information is correct.
Remote Listener Connection Information
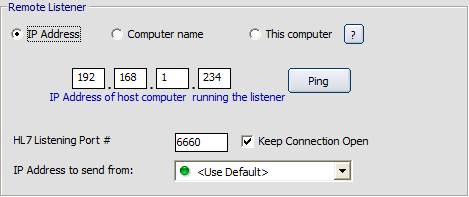
Settings in this section tell the router service how to communicate with the computer that is running an HL7 message listening application. First select what type of connection the service should make using one of the three options:
| • | IP Address : Connect to a specific TCP/IP address somewhere on your network. |
| • | Computer name : Enter a computer name or browse for another computer on your network. |
| • | This computer : The Listener service is running on the same computer as the router service. |
![]() *IMPORTANT NOTE*: The configuration program will not allow you to use the 'This computer' option if the computer has more than 1 TCP/IP address. Likewise, it will not allow you to select a 'Computer name' that has more than one TCP/IP address. If this is the case then you MUST choose the 'IP Address' option and enter the specific TCP/IP address to send to (even if it's on the same computer). If there is even a possibility that 'This computer' or a 'Computer name' might only have one TCP/IP address at the time of configuration but MIGHT later be assigned an additional IP address dynamically (as is the case when connecting to a VPN, or wireless network) then you should choose the 'IP Address' option and enter the specific TCP/IP address of the target computer. See VPNs and Multiple IP Addresses for further info.
*IMPORTANT NOTE*: The configuration program will not allow you to use the 'This computer' option if the computer has more than 1 TCP/IP address. Likewise, it will not allow you to select a 'Computer name' that has more than one TCP/IP address. If this is the case then you MUST choose the 'IP Address' option and enter the specific TCP/IP address to send to (even if it's on the same computer). If there is even a possibility that 'This computer' or a 'Computer name' might only have one TCP/IP address at the time of configuration but MIGHT later be assigned an additional IP address dynamically (as is the case when connecting to a VPN, or wireless network) then you should choose the 'IP Address' option and enter the specific TCP/IP address of the target computer. See VPNs and Multiple IP Addresses for further info.
The HL7 Listening Port #: Enter the port number that the listener service is 'listening' for HL7 messages on. *NOTE* All "Port Numbers" used must be "opened" in ALL hardware and software firewalls that exist between computers trying to do TCP/IP communication.
Keep Connection Open: If unchecked, the Router service will open the TCP/IP connection to the Listener, send an HL7 message, and then close the TCP/IP connection. If checked, the router will leave the TCP/IP connection open always and only try and reestablish it if the connection drops.
IP Address to send from: All TCP/IP communications (behind the scenes) work the same way. They are always a direct 'Point to Point' connection "FROM" 1 TCP/IP address "TO" another TCP/IP address. Even if you have selected the 'This computer' or 'Computer name' option. The service will still determine either the local computer's or the computer name's TCP/IP address and then use that as the "TO" address. The 'IP Address to send from' setting lets you explicitly set the "FROM" address. This setting is ONLY applicable in instances where the computer running the router service has more than one TCP/IP address. The only time that you should ever need to change this setting from '<Use Default>' would be a situation where the Listener you are attempting to connect to is being reached over a secure VPN (Virtual Private Network) and the local computer will have more than 1 TCP/IP address as a result (1 TCP/IP address assigned by the Local Area Network and 1 TCP/IP address assigned when connected to the VPN).
Monitor Connection Information
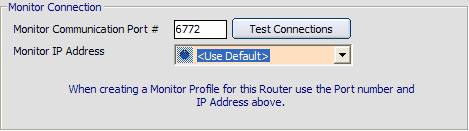
This section deals with how the router service will communicate the the EasyHL7 System Services Monitor. The System Services Monitor application has nothing to do with sending or receiving HL7 messages, it is simply a monitoring tool that allows users to view real-time statistics and status of an EasyHL7 service from a local or remote workstation.
Monitor Communications Port #: Must be a valid unused port on the computer running the router service.
HL7 Message Settings
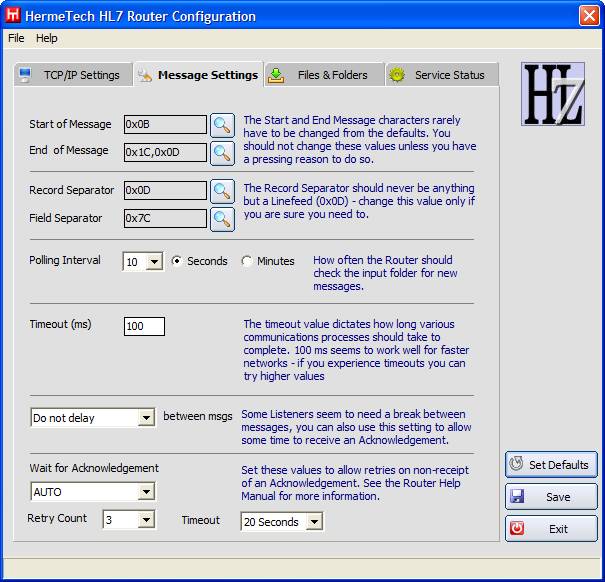
Settings in this section tell the router service how to correctly parse HL7 message data and create the appropriate 'envelope' to send the HL7 message to the listener. It also tells the router service how often to check for new messages to send, and how long to wait for the computer running the listener to respond when sending HL7 messages.
| • | Start of Message - The Ascii character(s) that the router service should use to mark the beginning of an HL7 message. |
| • | End of Message - The Ascii characters(s) that the router should use to mark the end of an HL7 message. |
| • | Record Sep - The Ascii character(s) that is used as the record (hl7 segment) separator. |
| • | Field Sep - The Ascii character (one character only) that is used as the field separator in the HL7 messages. |
| • | Polling Interval - Determines how often the router service should check for new messages to send. |
| • | Timeout (ms) - The amount of time (in milliseconds) to use as a 'port timeout' when initializing a TCP/IP connection. |
| • | Message Delay - Left to it's own devices, the EasyHL7 Router service will send HL7 data VERY quickly. Some listener applications (not ours), especially older ones, may have trouble keeping up. This setting allows you to configure a specific 'hard-coded' delay between individual messages. If you experience communications problems, you can try using this setting as a possible solution. |
| • | HL7 Acknowledgements - In this area configure how (or whether) the router service should wait for the HL7 listener to send back acknowledgements, how many times the router should resend the message (the Retry Count) if an expected acknowledgement is not received, and how long to wait for an acknowledgement (the Timeout) before deciding that the message needs to be resent to the listener. The main settings are: |
| 1. | NEVER - the router service will never wait for the listener (receiver) to send an acknowledgement back, it will just send messages as fast as it can (unless you've set the optional delay between messages). |
| 2. | ALWAYS - the router service will ALWAYS wait for an acknowledgement on ALL messages sent, if an acknowledgement on any message is not received within <the timeout> period, the message will be resent up to <the Retry Count> times. If an acknowledgement is not received for the message during this process, then the message will be placed into the 'Unacknowledged' folder. |
| 3. | AUTO - This setting is recommended. With this setting, the router service will intelligently decide whether to wait for an acknowledgement based on the contents of the 'Accept Acknowledgment Type' and 'Application Acknowledgement Type' fields in the messages MSH segment. If it determines that, according to what's in the message being sent, that the receiver should send an acknowledgement, then it will follow the 'wait, timeout, retry' logic described in the ALWAYS setting above. Otherwise, it will just proceed to the next message to be sent. |
Files and Folders
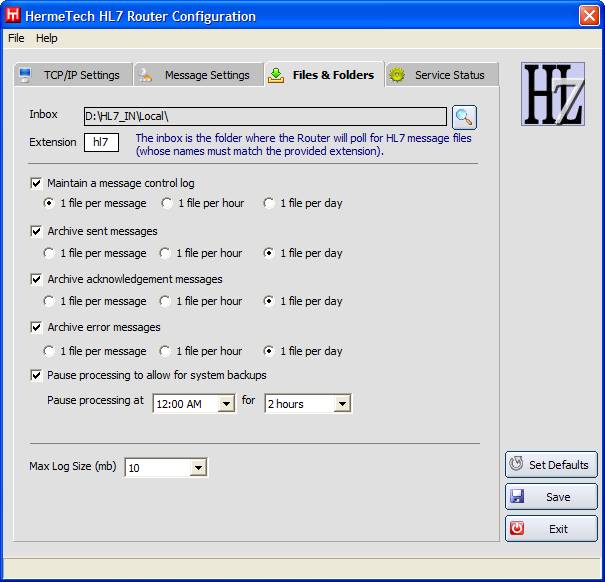
Files & Folders
The router service sends HL7 messages that have been written into data files in a folder on the computer's hard disk drive. Settings in this section tell the router service where and how to look for HL7 messages.
| • | Inbox - The folder where HL7 data files will be placed by your application(s) that produce outbound HL7 data. |
| • | Extension - The file extension the HL7 data files will use (the default is 'hl7'). Do not use punctuation or wildcard characters in the file extension. |
| • | Max Log Size (mb) - The router service will produce daily logs of activity. If extended logging is activated from the system monitor the router service will begin extensive logging of events as they occur internally. This can be very useful for debugging problems, BUT it takes up a lot of disk space and can slow down processing. This setting allows you to set a maximum file size for these log files. Log files will be stored in the Logs folder under the inbox (see below) and will only be kept for 1 week. |
A note about the Inbox folder. When you select a folder to use as the inbox folder, the router service will automatically create the folder structure shown below. This structure is used for the various logging and archiving processes discussed in the Archive Settings section below.
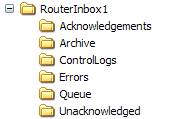
folder structure using 'RouterInbox1' as the base folder
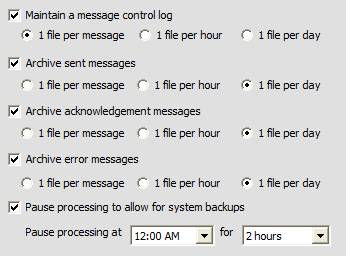
Control Log Settings
Settings in this section tell the router service whether or not to save a message control log.
| • | Maintain a message control log - If checked, a control log file will be created in the 'ControlLogs' folder under the folder you selected as the 'Inbox' folder above. It is a tab-delimited file which will contain a log of events related to each HL7 message sent or HL7 acknowledgement received. |
Archive Settings
Settings in this section tell the router service when and how to deal with archiving data and process pausing.
A not about archiving and log files. All archived HL7 message files and log files are only kept for seven (7) days and then they are automatically purged by the router service. Archived messages will be named according to the type selected. '1 file per message' will create a file named '<hl7 controlid>.<type>.hl7', '1 file per hour' will create files named '<datetime>.<type>.hl7', '1 file per day' will create files named '<date>.<type>.hl7'.
| • | Archive sent messages - If checked every HL7 message sent will be archived to the 'Archive' folder under the folder you selected as the 'Inbox' folder above. |
| • | Archive acknowledgement messages - If checked every acknowledgement HL7 message received by the router service will be saved to the 'Acknowledgements' folder under the folder selected as the 'Inbox' folder above. |
| • | Archive error messages - If checked every message acknowledged with an ERROR by the listener will be archived to the 'Errors' folder under the folder selected as the 'Inbox' folder above. |
| • | Pause processing to allow for system backups - If checked and configured, the router service will pause processing every day at the specified time and for the specified duration. |
monitoring a router service
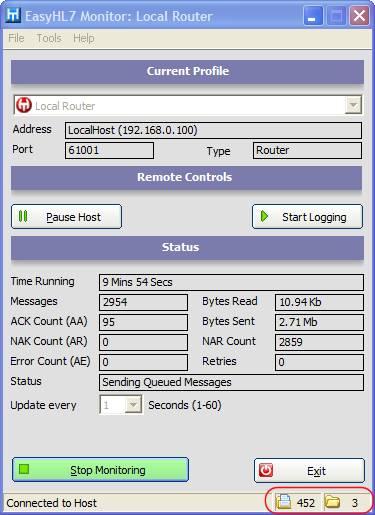
monitoring a router service
When using the monitor application you can see how long the service has been running, how many messages have been sent in that time, how many acknowledgements received, etc. One difference between monitoring a router service vs monitoring a listener service is the ability to see how many messages are waiting in queue to be sent and how many hl7 data files are waiting in the 'Inbox' folder (this is in the bottom right hand of the window).
Wrapping it all up
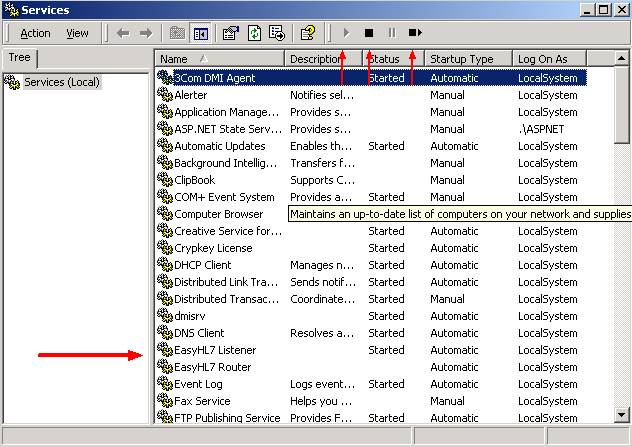
As mentioned at the top of this section, after you have configured the service for the first time, you must click 'File', 'Install Router Service' in the configuration window's menu. You only have to do this once. If you have completed everything successfully, you should be able to see the 'EasyHL7 Router' service in your system services (see below).