|
Configuring the 3 Connection Router |
Previous Top Next |
The Multi-Router Configuration application (HT_MultiRouter_Config.exe) was installed when you ran setup.exe (see Installation Instructions). To open the program, from the windows 'Start' menu select 'Programs' then under the 'Hermetech HL7' group click 'HL7 Multi-Router Configuration', this program contains the configuration utility for the HL7 Multi-Router.
![]() *IMPORTANT* For first time Multi-Router installation. After you have completely filled out this window and saved your configuration (see below) you MUST click 'File' then 'Install Router Service' to register the application in your systems services.
*IMPORTANT* For first time Multi-Router installation. After you have completely filled out this window and saved your configuration (see below) you MUST click 'File' then 'Install Router Service' to register the application in your systems services.
the Multi-Router service configuration window
Use the 'Save' button to save your router configuration settings. If the router service is running you can use the 'Test Connection' button to verify the connection information is correct.
Adding and Removing Profiles

Profile Control Area
The screenshot above shows the Profile Control area, this is where you can Select, Add and Remove Router Profiles. The section numbers below correspond to the numbers mapped to the screen shot in red above:
1. Create Router Profile - You can add any number of profiles, but the number of concurrent active profiles is governed by the license you have purchased. Clicking this button will cause a dialog to appear:
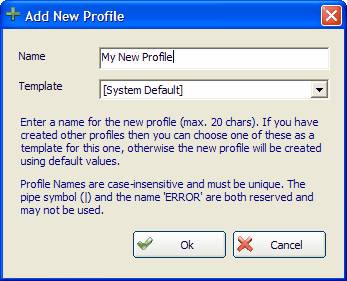
A name is required for each profile, and it must be unique and cannot be 'ERROR' (as this is used by the Custom Message Handler). You can choose a template to base your new profile upon; the template may be any existing profile definition or the System Default.
2. Delete Router Profile - Press this button to remove the currently selected profile. You cannot remove the last profile. You will be asked for confirmation before the profile is physically removed.
3. Profile List - This area shows the Profiles that have been declared and their active status. Select a profile by clicking on it.
4. Legend - The meaning of the symbols next to each profile in the list.
5. Save - Saves all unsaved profile data.
6. Status Bar - The status bar is made up of four panels. The first panel contains transitory program status information such as "Profile Saved", the next panel displays the profile 'dirty' status (if a datum is said to be 'dirty' it means that it has been changed but not saved). The third panel shows how many current active profiles there are, the final panel shows how many concurrent active profiles you are allowed by your license.
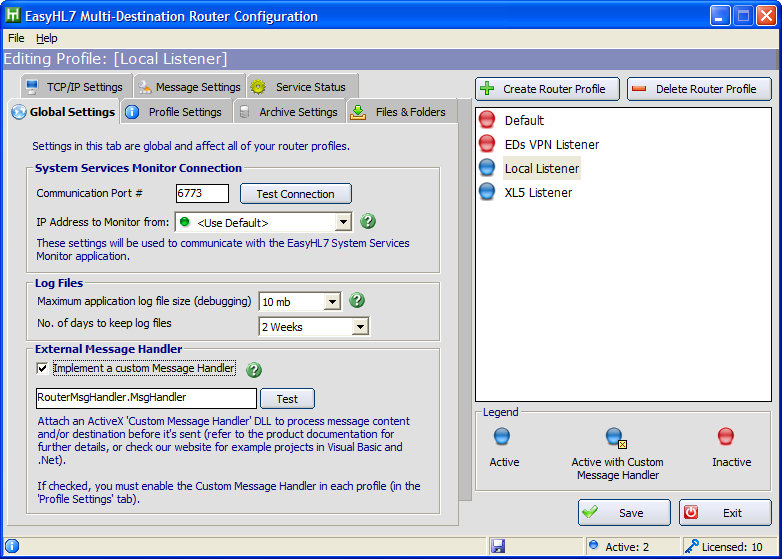
The Global Configuration Setting
This section deals with the Global settings for the Multi-Router and are applicable to all profiles.
System Services Monitor Connection Information
Settings in this section tell the router service how to communicate with the HermeTech HL7 Service Monitor.
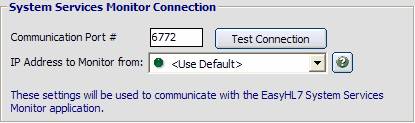
| • | Communication Port # - This port number will be used to communicate with the HL7 Service Monitor. In the HL7 Service Monitor you will create a 'Router' monitor profile and use it to view the router service in action. See the screenshot below. |
| • | IP Address to Monitor from: All TCP/IP communications (behind the scenes) work the same way. They are always a direct 'Point to Point' connection "FROM" 1 TCP/IP address "TO" another TCP/IP address. The EasyHL7 System Services Monitor works the same way. The service will still determine the local computer's TCP/IP address and the Monitor application will use that as the "TO" address. This setting lets you explicitly determine which TCP/IP address the service will use to 'Listen' for monitor traffic. This setting is ONLY applicable in instances where the computer running the service has more than one TCP/IP address. The only time that you should ever need to change this setting from '<Use Default>' would be a situation where the service you are trying to monitor is being reached over a secure VPN (Virtual Private Network) and the computer running the service will have more than 1 TCP/IP address ( I.E. 1 TCP/IP address assigned by the Local Area Network and 1 TCP/IP address assigned when connected to the VPN). |
Log Files
Log files are used to hold useful information about what is going on, in, and through the Multi-Router Service. A new log file is created at the start of each day that the service is running.
A small amount of startup information is stored in the log files each time the service is started, errors will also be recorded. Full logging can be switched on and off from within the EasyHL7 Monitor. A typical session startup might look like this:
25 Jul 2007 22:56:15.72 =======================================================
25 Jul 2007 22:56:15.72 MULTI-ROUTER Version 4.2 STARTING
25 Jul 2007 22:56:15.73 =======================================================
25 Jul 2007 22:56:15.73 Build: 20070306001
25 Jul 2007 22:56:15.78 Loading Configuration
25 Jul 2007 22:56:16.05 Listener established on port 6773
25 Jul 2007 22:56:16.36 Profile LOCAL LISTENER (1 of 4) loaded
25 Jul 2007 22:56:16.36 The EasyHL7 Multi-Destination Router has started.
25 Jul 2007 22:56:17.42 Maintenance completed. Next run scheduled for 26 Jul 2007 12:00 AM
If you should experience any problem while running the Multi-Router service (or in fact, any EasyHL7 service), your first port of call should be the log file.
Full logging can be switched on and off from the EasyHL7 Monitor.
The Configuration settings for the Log Files cover the maximum size an individual log file will be allowed to reach. The length of time that a log file will be retained can also be set (log files are automatically purged once the retention period has been exceeded).
External Message Handler
Checking 'Implement a Custom Message Handler' allows you to add an ActiveX DLL and classname that will be called each time a message is ready for transmission to the Listener. Press the 'Test' button to ensure that the dll/class you have entered meets the requirements of Router Plugins.
monitoring a multi-router service
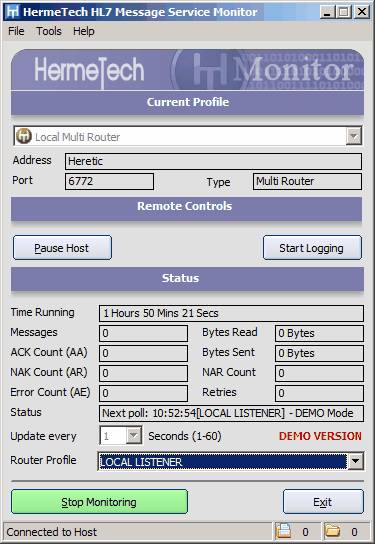
When using the monitor application you can see how long the service has been running, how many messages have been sent in that time, how many acknowledgements received, etc. One difference between monitoring a router service vs monitoring a listener service is the ability to see how many messages are waiting in queue to be sent and how many hl7 data files are waiting in the 'Inbox' folder (this is in the bottom right hand of the window). A further difference when monitoring Multi-Router services is the ability to select whether you want to monitor all profiles (which aggregates throughput counts), or to monitor a single profile by selecting the profile by name from the 'Router Profile' drop-down list (which will be populated once you have started monitoring).
Configuration Instructions By Section
**Important** Each of the sections below can be set up independently for each profile that you want to define (up to the maximum number of connections allowed by your license.
Profile Settings

| • | Profile Name - This value is set as part of the process of adding a profile and cannot be changed. |
| • | Active - Check this to make a profile active/inactive (an inactive profile will be inored by the multi-router service). |
| • | Pause processing to allow for system backups - If checked, allows you to set a time and duration for which all processing for the profile will be suspended. |
| • | Use the External Message Handler in this profile - If you have defined an External Message Handler in the 'Global Settings' checking this box will cause that message handler to be used in the selected profile. *NOTE* If you define an external message handler in the 'Global Settings' then it MUST be used in at least 1 Active profile. |
| • | Maximum application log file size - The service will keep an application log (built daily), this setting determines how large that file can grow before the service will stop writing to it. |
| • | Notes - Enter any text here to describe the selected profile for future reference. |
TCP/IP Settings
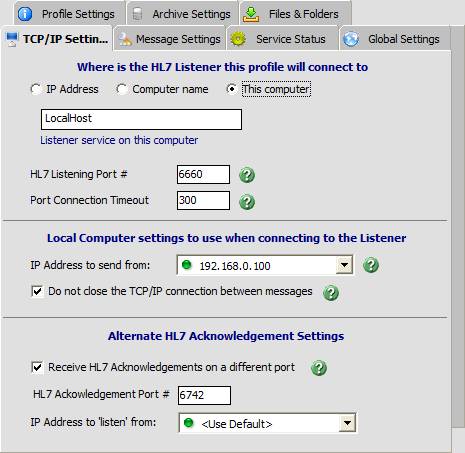
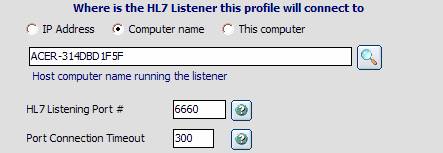
Where is the HL7 Listener? Settings in this section tell the router service how to communicate with the computer that is running an HL7 message listening application. First select what type of connection the service should make using one of the three options.
| • | HL7 Listening Port #: This port # is the port on the computer that you selected above that the listener application is actively listening for HL7 messages on. *HINT* The listening port number is something that is negotiated in advance between whomever owns the listener application, and whomever owns the router application. So if you don't know what the listening port should be, contact the vendor of the software running the HL7 listener application. |
| • | Port Connection Timeout: The amount of time (in milliseconds) to use as the 'Timeout' when establishing a connection to the remote computer. |
Local Computer Settings
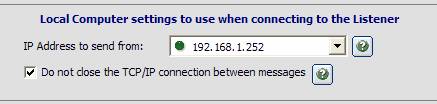
| • | IP Address to send from: All TCP/IP communications (behind the scenes) work the same way. They are always a direct 'Point to Point' connection "FROM" 1 TCP/IP address "TO" another TCP/IP address. Even if you have selected the 'This computer' or 'Computer name' option. The service will still determine either the local computer's or the computer name's TCP/IP address and then use that as the "TO" address. The 'IP Address to send from' setting lets you explicitly set the "FROM" address. This setting is ONLY applicable in instances where the computer running the router service has more than one TCP/IP address. The only time that you should ever need to change this setting from '<Use Default>' would be a situation where the Listener you are attempting to connect to is being reached over a secure VPN (Virtual Private Network) and the local computer will have more than 1 TCP/IP address as a result (1 TCP/IP address assigned by the Local Area Network and 1 TCP/IP address assigned when connected to the VPN). |
| • | Do not close the TCP/IP connection between messages: This advanced feature deals with TCP/IP communications and quirks that may arise between different vendors. The standard way to send an HL7 message via TCP/IP is to: |
| 1. | Open a TCP/IP connection to the remote computer's listening port. |
| 2. | Send an HL7 message. |
| 3. | Wait for an HL7 acknowledgement (if you expect one to come back). |
| 4. | Close the TCP/IP connection to the remote computer. |
Some listener software (not ours) can react badly if the router closes the TCP/IP connection. Checking this box will tell this EasyHL7 Multi-Router Profile to hold the TCP/IP connection open after message traffic is sent, allowing the listener application to close the connection (or not) as they see fit. You can try different values on this setting if you experience communication problems between the router and the listener. Also, if you expect to receive HL7 acknowledgements from the receiving application you should either a) check this box so that the router will keep the connection open after sending the message allowing the HL7 listener to send back the acknowledgement OR b) use the message delay feature in the transmission profile section (see below) OR c) configure the listener service to send HL7 acknowledgements via a different TCP/IP port and the router service to receive them on a different port (see the monitor communication section below).
HL7 Message Settings
Settings in this section tell the router service how to correctly parse HL7 message data and create the appropriate 'envelope' to send the HL7 message to the listener. It also tells the router service how often to check for new messages to send, and how long to wait for the computer running the listener to respond when sending HL7 messages.
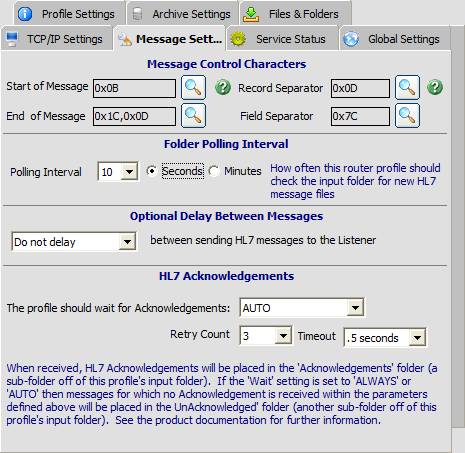
| • | Start of Message - The Ascii character(s) that the router service should use to mark the beginning of an HL7 message. |
| • | End of Message - The Ascii characters(s) that the router should use to mark the end of an HL7 message. |
| • | Record Separator - The Ascii character(s) that is used as the record (hl7 segment) separator. |
| • | Field Separator - The Ascii character (one character only) that is used as the field separator in the HL7 messages. |
| • | Folder Polling Interval - Determines how often the router service should check the profile inbox folder for new messages to send. |
| • | Optional Delay Between Messages- Left to it's own devices, the EasyHL7 Router service will send HL7 data VERY quickly. Some listener applications (not ours), especially older ones, may have trouble keeping up. This setting allows you to configure a specific 'hard-coded' delay between individual messages. If you experience communications problems, you can try using this setting as a possible solution. |
| • | HL7 Acknowledgements - In this area configure how (or whether) the router profile should wait for the HL7 listener to send back acknowledgements, how many times the router should resend the message (the Retry Count) if an expected acknowledgement is not received, and how long to wait for an acknowledgement (the Timeout) before deciding that the message needs to be resent to the listener. The main settings are: |
| 1. | NEVER - the router profile will never wait for the listener (receiver) to send an acknowledgement back, it will just send messages as fast as it can (unless you've set the optional delay between messages). |
| 2. | ALWAYS - the router profile will ALWAYS wait for an acknowledgement on ALL messages sent, if an acknowledgement on any message is not received within <the timeout> period, the message will be resent up to <the Retry Count> times. If an acknowledgement is not received for the message during this process, then the message will be placed into the 'Unacknowledged' folder. |
| 3. | AUTO - This setting is recommended. With this setting, the router profile will intelligently decide whether to wait for an acknowledgement based on the contents of the 'Accept Acknowledgment Type' and 'Application Acknowledgement Type' fields in the messages MSH segment. If it determines that, according to what's in the message being sent, that the receiver should send an acknowledgement, then it will follow the 'wait, timeout, retry' logic described in the ALWAYS setting above. Otherwise, it will just proceed to the next message to be sent. |
Files & Folders
The router service sends HL7 messages that have been written into data files in a folder on the computer's hard disk drive. Settings in this section tell the router service where and how to look for HL7 messages.
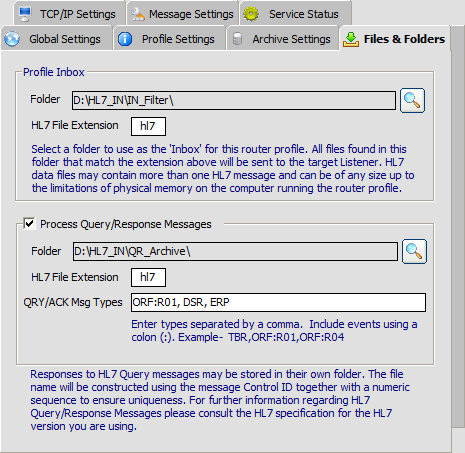
| • | Profile Inbox Folder - The folder where HL7 data files will be placed by your application(s) that produce outbound HL7 data. |
| • | Extension - The file extension the HL7 data files will use (the default is 'hl7'). Do not use punctuation or wildcard characters in the file extension. |
A note about the Inbox folder. When you select a folder to use as the inbox folder, the router service will automatically create the folder structure shown below. This structure is used for the various logging and archiving processes discussed in the Archive Settings section below.
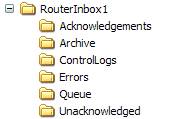
folder structure using 'RouterInbox1' as the base folder
Process Query/Response Messages
Turn this option on to handle unsolicited Query Response messages (see the HL7 specification for a further information regarding the Query/Response protocols).
| • | Folder - the folder in which incoming Query Response messages will be stored |
| • | HL7 File Extension - Query Response message file names are built using the Message Control ID together with a numeric sequence to ensure uniqueness, the extension is supplied by the user. |
| • | QRY/ACK Message types - There are many types of Query Response, you can choose which ones you want the EasyHL7 Multi-Router to respond to.Message Types are separated by a comma, you can optionally include Events in the filter by adding the Event after the appropriate Type separated by a colon, as in the following example: |
TBR,ORF:R01,ORF:R04
Archive Settings
Settings in this section tell the router service when and how to deal with archiving data and process pausing.
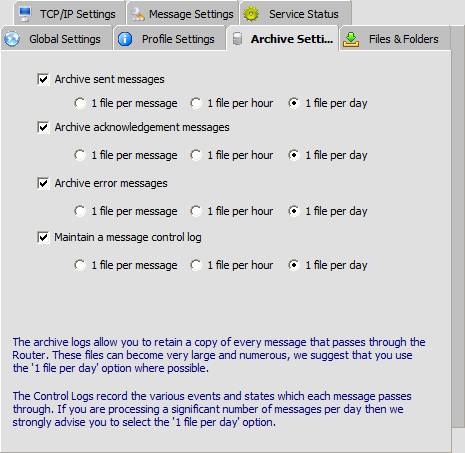
A not about archiving and log files. All archived HL7 message files and log files are only kept for seven (7) days and then they are automatically purged by the router service. Archived messages will be named according to the type selected. '1 file per message' will create a file named named '<hl7 controlid>.<type>.hl7', '1 file per hour' will create files named '<datetime>.<type>.hl7', '1 file per day' will create files named '<date>.<type>.hl7'.
| • | Archive sent messages - If checked every HL7 message sent will be archived to the 'Archive' folder under the folder you selected as the 'Inbox' folder above. |
| • | Archive acknowledgement messages - If checked every acknowledgement HL7 message received by the router service will be saved to the 'Acknowledgements' folder under the folder selected as the 'Inbox' folder above. |
| • | Archive error messages - If checked every message acknowledged with an ERROR by the listener will be archived to the 'Errors' folder under the folder selected as the 'Inbox' folder above. |
| • | Pause processing to allow for system backups - If checked and configured, the router service will pause processing every day at the specified time and for the specified duration. |
| • | Maintain a message control log - If checked, a control log file will be created in the 'ControlLogs' folder under the folder you selected as the 'Inbox' folder above. It is a tab-delimited file which will contain a log of events related to each HL7 message sent or HL7 acknowledgement received. |
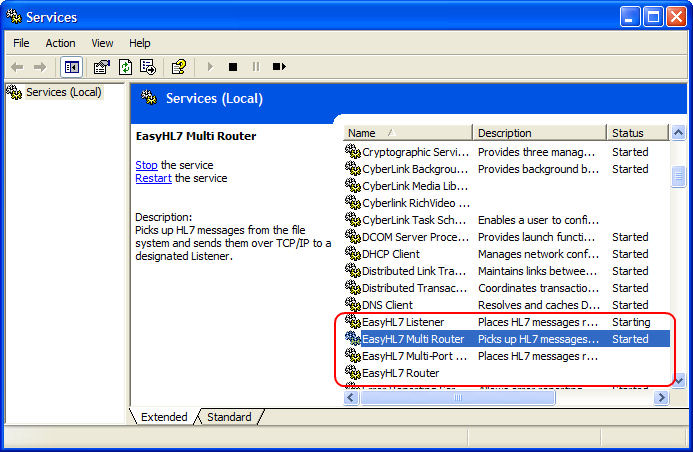
Wrapping it all up
As mentioned at the top of this section, after you have configured the service for the first time, you must click 'File', 'Install Router Service' in the configuration window's menu. You only have to do this once. If you have completed everything successfully, you should be able to see the 'EasyHL7 Router' service in your system services (see below).